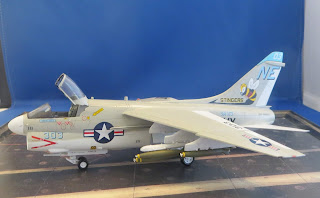
A-7A Corsair II & an A-7E Corsair II, too!
The Fujimi 1/72nd scale A-7 Corsairs:
Several things going on here: I played with some different panel line techniques. After I primed the model with flat white enamel & it dried, I drew in & restored the panel lines with a medium lead pencil on the model scheme that would remain white. Then I went over the flat white with gloss white enamel mixed with 40% paint and 60% thinner. This overcoat produced a simi-gloss finish that wasn't a toy like high-gloss appearance. The translucent overcoat toned down the pencil lines. I was pleased with the effect, but next time I'll used a little darker lead to yield a little more contrast.
After masking the white, I painted the gloss gull gray part of the finish using the same flat paint-gloss overcoat technique. I mixed an artist oil paint wash using black and burnt umber. Using a brush, I painted the panel lines with wash and waited until it dried. I wiped the line overflow with an oil thinner dampen paper towel to remove the excess leaving just the lines highlighted.
I did the same thing in places on fuselage using a product called "The Detailer" . The results using the black shade was pretty much the same as the oil. On the plus side, The Detailer is water based & ready to use right out of the bottle, it dried faster than the oil wash & cleaned up with water. On the negative side, it didn't seem as persistent as the oil wash; many times during the cleanup with a lightly water dampened paper towel, the wash in the panel line would come up with overflow.
When I was researching the schemes and loads for these models, I came across a picture of a VA-113 A-7E with a mix the bombs that had one or two yellow rings on the bomb nose. The yellow ring indicated "high-explosive" in the bomb casing. The Navy added the second ring to bombs indicating the bomb had a thermal insulation coat. This thermal coating was added after the Oriskany and Forrestal fires to dramatically increase the cook-off time in the event of a fire giving fire fighters more time to cool or dumb the bomb.
To simulate the thermal coating, I hand painted on a coat of Mr. Surfacer and roughed up the finish as it dried using an old paint brush with the bristles cut back. After painting, the final finish isn't as rough and obvious as I had hoped. Used yellow decal stripes for bomb markings. Using decal solvent to force the stripe to conform with the compound bomb curve didn't yield the hard consistent results I was hoping for.
The A-7A of VA-147:
VA-147 introduced the Corsair II to fleet service and made the A-7's first combat deployment in 1967.
The A-7E of VA-113:
VA-113 deployed on the USS Ranger in late 1972 to the spring 1973.
References:
1. Detail & Scale Vol 22 A-7 Corsair II by Bert Kinzey, Kalmbach Publishing Co, 1986
2. US NAVY A-7 CORSAIR II UNITS of the VIETNAM WAR, Osprey Combat Aircraft Vol 48 by Norman Birzer & Peter Mersky, Osprey Publishing Limited, Oxford, UK, 2004.


Comments
Post a Comment
Please keep comments civil and on topic. Any comment can be remove without warning at the discretion of the moderator.