Operation Igloo White with Batcat prowling the skies! FINAL SITREP 2 JUN 18
Operation Igloo White
Igloo White was a covert United States joint military electronic warfare operation conducted from late January 1968 until February 1973, during the Vietnam War. These missions were carried out by the 553d Reconnaissance Wing, a U.S. Air Force unit flying modified EC-121R Warning Star aircraft, and VO-67, a specialized U.S. Navy unit flying highly modified OP-2E Neptune aircraft. This state-of-the-art operation utilized electronic sensors, computers, and communications relay aircraft in an attempt to automate intelligence collection. The system would then assist in the direction of strike aircraft to their targets. The objective of those attacks was the logistical system of the People's Army of Vietnam (PAVN) that snaked through southeastern Laos and was known as the Ho Chi Minh Trail (the Truong Son Road to the North Vietnamese)." (1)
EC-121R Warning Star; call sign "Batcat"
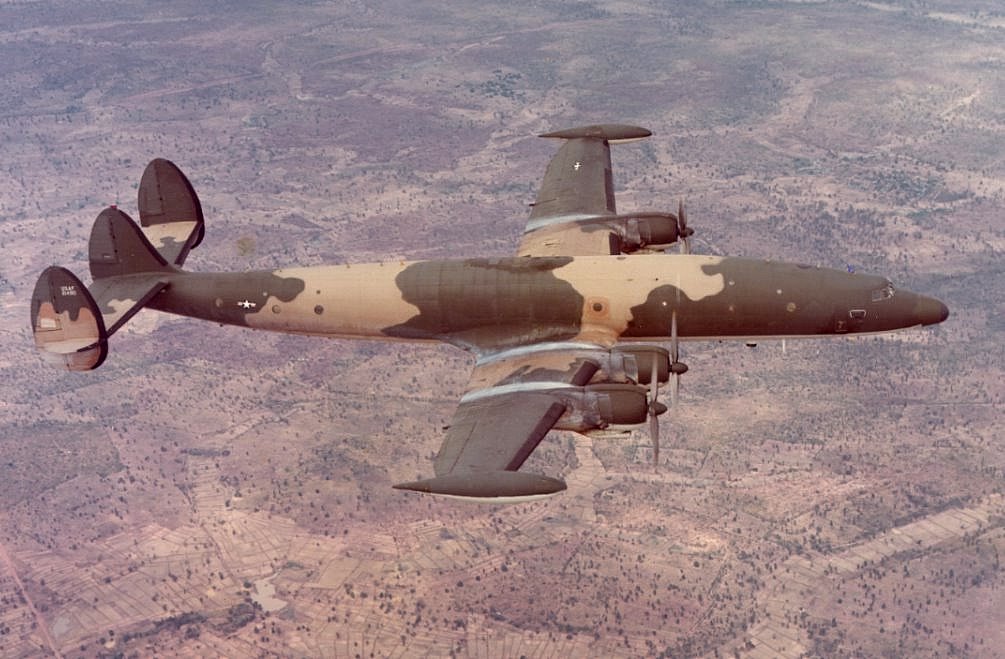
"During the Vietnam War some 40 EC-121s were modified from U.S. Navy WV-2 and WV-3 early warning Constellations for use with ground sensors to detect enemy troop movements along the Ho Chi Minh Trail, and 25 were deployed to Korat RTAFB as a part of Operation Igloo White. The resulting EC-121R configuration was nicknamed the Batcat.Two Batcats were lost during the war, with the loss of 22 crewmen, one in a takeoff accident during a thunderstorm on 25 April 1969, the other on 6 September 1969, in a landing accident. Four Thai civilians on the ground were also killed in the second crash.
Batcat EC-121s were camouflaged in the standard three-color Southeast Asia scheme while the College Eye/Disco early warning aircraft were not. BatCat missions were 18 hours in length, with eight hours on station at one of 11 color-coded orbits used during their five-year history, three of which were over South Vietnam, six over Laos, one over Cambodia, and one over the Gulf of Tonkin.
EC-121Rs were operated by the 553d and 554th Reconnaissance Squadrons of the 553d Reconnaissance Wing, between 19 October 1967 and 15 December 1970, with approximately 20 Batcats on hand at any one time. The Wing was inactivated 15 December 1970, and the 554th RS relocated to Nakhon Phanom RTAFB to fly QU-22 sensor monitors nicknamed "Baby Bats". Initially with 11 aircraft, the 553rd RS continued operations for another year, gradually returning aircraft and crews to the United States. The final Batcat mission was flown 5 December 1971. The last remaining administrative and support personnel returned to Otis AFB in January 1972." (2)
1. Operation Igloo White, From Wikipedia, the free encyclopedia
2. Lockheed EC-121 Warning Star From Wikipedia, the free encyclopedia
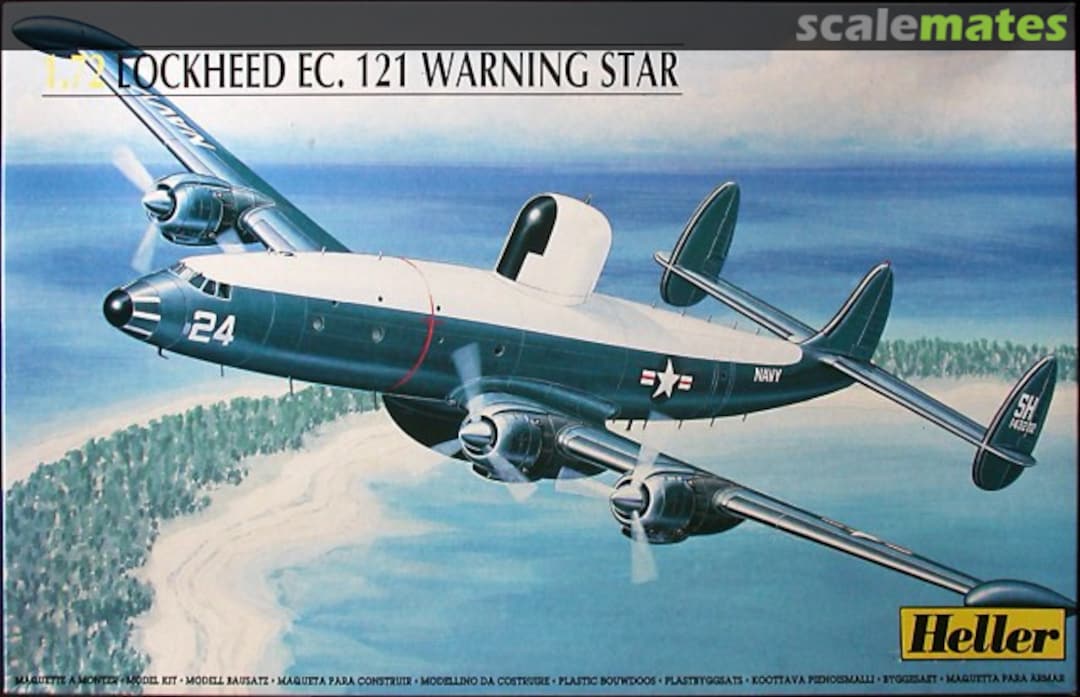
SOOOOoooo...... if you haven't guessed by now, the EC-121R Batcat aircraft is my fall model project. I came by a Heller EC-121 Warning Star kit at an estate sale. Yep, I grabbed it and a few other finds as well: stay tuned!
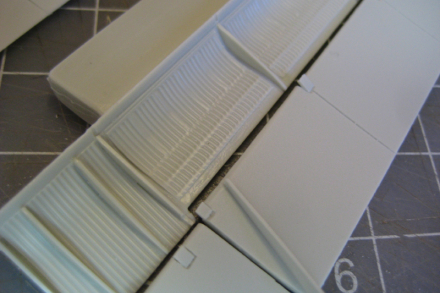
The only detail I'm going to add is the flap set from Fisher Model & Pattern. The flaps were, usually, down when the plane was on the ground. I could scratch build them, but let's see if I can get this done before the next century arrives.
You're welcome to follow along here in the coming weeks...... er, ah, months, maybe years as the subject progresses. I'll build the "BATCAT" along side a Operation Linebacker F-4D Phantom.
To the work bench!
SITREP 1
I've started the kit; my first decision was to add very little or no additional detail other than the wing flaps & wells. The cabin is closed, & the windows are tiny allowing zero visibility into the interior. As you can see in the picture below, I didn't do anything to cockpit except paint out the white & blue plastic parts. (Blue? Who thought that was a good idea??!! Trouble ahead me thinks!) and paint the seat cushions a darker gray than the frame. The windshield might allow a viewer to see a little bit of the cabin, but not much. So, the console combing is painted black.


The landing gear wells are devoid of any structural detail and could use some attention. But, since no one is going to turn it over, there's no reason to scratch build the details.
So, I'll focus on the finish. The EC-121R spent it's operational career in South East Asia enduring months of Monsoon followed by months blistering heat & sun. Rinse; repeat. All the in theater photos I've found show a faded and weather beaten airframe. I'll put my airbrush skills to the test & see if I can replicate a well worn veteran. Besides the finish, I'll pay attention to the antenna arrangement. After all, that's what makes the EC-121R unique. I'll have to scratch build a few parts to replicate some specific antennas.
The next step is the a marathon painting session painting the landing gear wells, doors and appropriate Phantom parts white.
RJ
SITREP 2 8OCT17
Haven't had much opportunity to get to my modeling desk; I hate it when life interferes with my hobbies! I cut out a block of time to paint the white stuff this week-end.

The issue with gloss paints on small scale models is the "toy" like appearance a really shinny finish has. So my favorite technique for painting gloss colors on small scale models is:
- paint the area with light coats in the flat color until the surface is completely covered.
- thin the gloss paint with 50% -60% thinner. It will be water thin and translucent.
- Spray over the flat coverage until the color looks damp.
When dry, if the finish isn't shinny enough for you, add another light coat: repeat until you're happy with it. The finish will be a soft gloss/satin look that's not too shinny avoiding the toy appearance.
I'm still worried about that blue plastic. Any uncovered blue plastic will draw the viewer's eye right to it! The contrast with the white will be so pronounced.
I've added the forward gear bay to the fuselage half. The fit is not quite right. When I dry fit the fuselage halves together, the seam doesn't want to close at the back of the gear bay. That's what clamps are for; I reckon.

I glued a piece of black painted sheet plastic over the cabin door, so the viewer won't be able see into the interior through the wind shield. Frankly, I don't think that'll be an issue, but why chance it.

The internet gouge on the Heller Constellation family of kits is the model is an obstinate tail sitter. Well, I'm an obstinate tail sitter ma'self. I'll show it!. I found a large stubby bolt and a couple of nuts to use for a weight. I glued a piece of kit spruce (the blue runner in the picture) in the fuselage to act as the weight base then place some masking tape over the window holes in the fuselage. I super-glued the bolt and nuts in the fuselage and used modeling clay to help hold it place since cyanoacrylate adhesive performance with smooth metal is.....ah.....mixed. The tape ensures clay won't ooze out of the window openings as I push it down behind the bolt and nuts.

I decided not to use the kit clear parts except for the cockpit windshield. For all the windows, I'll use Micro Kristal Klear by Microscale. I'm sold on the stuff!
The next step is painting the landing gear, engine faces and cowl interiors aluminum then closing the fuselage.
RJ
SITREP 3 15OCT17
Got the fuselage closed. Unlike many older kits, the fit is pretty tight. Light sanding on the fuselage will pretty much dress up the seams.


I primed all the parts requiring an aluminum finish with gloss black. After the parts have dried over night , I'll spray a coat of Alclad aluminum. I have a storage container with a snap lock lid. I place the parts in the container to keep the dust & DOG fur out of the finish. You can see it, here, holding the parts.

Last task this week-end was priming the resin flaps & wing wells. Sometimes resin parts won't take paint very well. It can flake off or crack. To preclude that possibility, I washed the parts in warm water and dish washing soap to get any mold release solvents off the parts. After they dried, I painted the parts with Mr. Resin primer made by Mr. Hobby. You really can't see much in the picture because the primer is pretty much the same shade of gray as the resin pieces. Mr Resin went down with no problems & produced a smooth finish. We'll see how it looks painted.

Next is airbrush the aluminum shade on the primed parts then start the major wing surgery.
RJ
SITREP 4 5NOV17
I got the fuselage seams cleaned-up. I used Mr Surfacer primer to fill the imperfections in the seams. I filled the locating holes for the top radome with plastic rod followed by more primer. I was afraid I would knock off some of the antennas filling and sanding the seams, so I cut them all off from front-to back on the top & bottom. After I cut one off, I drilled a hole through the plastic to locate the antenna part when I glue them back on. Hard to see, but they're there. Since all my ref photos show them as white, as glue them back after painting the plane.


On the lower wing section , again, filled the a radome locating hole with plastic & cut out the flap sections to install the resin flap wells.

I noticed on my ref photos that the elevators were relaxed when the plane was parked. 
U. S. Air Force photo
So, I cut them out, too.

I'll reattached them with a down angle.
More wing & elevator surgery to come.
RJ
SITREP 5 12NOV17
More work on the wings and elevators. I filled in the gaps on the tail planes and elevators with Tamiya white putty, and where I cut away too much flap I glued on a shim of plastic.

The results after filling and sanding.


I got the inboard wing section together with the installed flat wells. You can see where I made some ragged cuts. I'll fill them in the plastic shims then sand and fill until smooth.


There are 4 vents molded in the wing. The EC-121R only had one vent, so the outboard 3 were filled. The raised lines for the deicing boots are grossly out of scale. I used the lines as a scribing guide and scribed recessed lines. I used a wash to show some the lines, so they're visible in the picture.

After I sand away the boot lines, I'll paint the deicing boots black and use the recessed lines to guide the trimming of the masking tape.
More wing work required before I attached the wings to the fuselage.
RJ
SITREP 6 4 JAN 18
Been awhile since I've updated the progress. I got sick after the Thanksgiving Holiday for about a week or so. When I felt well enough to pick up normal life, I was well into the Christmas madness! Now that the holidays have wound down, back to the work bench.
Dry fitting the wings to the fuselage, I found the fit is very tight. So tight, if fact, when I pushed the wing into place it flexed the rear of the opening cracking the joint. So, I braced up the seam with a section of kit tree to prevent the cracking and hold the shape.

The wing section is finished. I sanded off all the oversized panel lines outlining the deicer boots, cleaned up the seams, and blended in the flap wells. The flap instructions stated the most inboard well sections should cut off for the radar versions. This isn't a radar version, so I didn't cut them off and installed the entire flap well on each wing. Later. it occurred to me that the Igloo-White aircraft were all modified from the USN Warning Star version. Sure enough, when I carefully checked my reference photos, none of those most inboard flaps are installed. I'll cover them over after I mate the wing to the fuselage.....sigh.

I got all the sub-assemblies complete, wheels are masked and I fabricated the fin antennas from the spare-box pieces.....

.... and the fuselage EW antennas are in place.

There are 2 on each side. After painting the deicing boots, I'll mate the wing and fuselage and commence painting. May be awhile, it's too cold to paint. We got a little snow here in the sunny south; last time that happen was in 2008. My front yard.

RJ
SITREP 7 11 FEB 18
Been filling and sanding all this time. Finally fixed the bottom wing and closed of the flap well I shouldn't have cut out.


The BATCAT had a light on the center tailfin the model doesn't depict. I filled a notch at the fin top to give the drill bit a place to bite to drill the hole. Then glued a piece of styrene rod to mount the lens after I paint the plane. 
Got the tail planes glued on.

Here, you can see the casual droop I'm the elevators.

Just about ready to hit the paint booth me thinks!
RJ
SITREP 8 7 APR 18
Been awhile. I spilled lacquer thinner on my model bench and ruined the kits wheels. I was major league bummed. I straighten-out my model bench, ordered replacement wheels from Fisher Model & Pattern.

I wasn't having fun, so I brooded for a spell.
Rain this past week-end, so this seemed like a good time to re-engage. I embarked on a marathon painting binge.


The wheels need a little touchup. I'll weather and finish them between paint secessions.
I'm over the hump and it's down hill from here (I hope!).
RJ
SITREP 9 15 APR 18

Here's the Masking over the camo-gray:


I sprayed Tan first. The Testors Model Master Tan FS 30219 doesn't look pink enough to my eye. So, I added Testors light tan (that comes in the 1/4 ounce bottle) a little at a time until it looked right to me.

Medium Green is next.
RJ
SITREP 10 20 MAY 18
Here's the masking for the Medium Green. I cut copy paper free hand following a picture of the airframe. For the places on the plane that weren't visible on the photos, I reverted to the camo-diagram in USAF TO 1-1-4.
Here's the mask:

Here's the Medium green:


Here's how it turned out:

I weathered with pastels to give it a weather beaten look, airbrushed the exhaust stains & added pastels to them. Finally, I removed the deicing boot masks. I'm calling the paining done!

Next up! Final assembly & done!
RJ
SITREP 11 28 MAY 18
Finished the assembly of the landing gear. A real concern is the lack of mating surface to attach the landing gear struts. To improve stability, I drill a hole in the top of the main struts than glued in a metal rod I cut from a paper clip.

To complete the props, I laid down decal stripes to define the edge of the black part of the prop blade & the yellow tips.


RJ
SITREP-12 1 JUN 18: DISASTER STRIKES! 😱😱😱
When I stood the model on it's landing gear, it, promptly plopped down on its tail!

I know I packed the forward area full of weight and test balanced the fuselage & wings many times...… sigh. What happen? I didn't anticipate the length of the nose gear. When it raised the nose to the proper sitting position the plane tilt back.
Take off the nose gear, and it falls forward.

Now what?!! My first thought was to glue the front landing gear to the base, but that had several draw backs. The dilemma was how to get more weight forward of the wing. I placed a small condiment cup on the top of the fuselage and poured lead bird shot until the plane lifted off its tail. Then added a little more so as not to repeat this drill.

Then I mixed in white glue until every little shot was coated.

I turn the plane up vertical and shoveled the glue-shot through the most forward porthole. When finished, I took a wet paper towel & wiped the smeared white glue off the fuselage around the porthole as quick as I could. Then rested the plane on its nose overnight.

The next day light shaking revealed no rattle or little balls rolling about......whew! 
We now return to our regularly scheduled build thread. Secure from general quarters; re-stow all gear...…. BEER!
RJ
FINAL SITREP 2 JUN 18
I completed final assembly; I got all the external pieces in place. Another shortcoming on this kit is the lack of gluing surface or attachments. I drilled a hole in the base of the part and then drilled a locating hole in the fuselage. Here's the antennas to show the technique for all the parts:

Here's the complete plane:


Now for the display base. Using a medium poster frame I'll place the plane on a reproduction of a surveyor's plat of the Korat airbase I found on the internet in pdf format. A friend printed the plat to size on a plotter. The base display consists of the frame, the plat, a patch for the 553rd Reconnaissance Wing, a USAF period patch, USAF pilot wings and a placard.

All put together:

The final task is finish painting the ground crew figure and mount him on the maintenance stand to add a visual scale reference.

I'm calling this one done.
RJ


This comment has been removed by the author.
ReplyDeleteLooks good Richard, I'm looking forward to seeing this finished.
ReplyDeleteNice build chronicle of an interesting aircraft and classic kit!
ReplyDeleteBeautiful work as always, Richard. Too bad it won't make an appearance at the club meeting!!!
ReplyDeleteModel of the Month!!
You sir, are the master of the SEA camo job.
ReplyDeleteI'm really glad you shared info on modifying the MM colors. I typically don't use enamels, as I find them hard to clean up, but next time I paint in SEA, I'm going to use your formula. Thanks a million, for sharing, and keep up with the blog. I really like what I see so far.