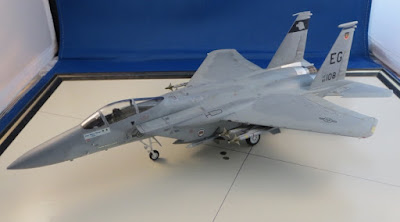
F-15C! Desert Storm MiG Killer!
1/72nd scale Hasegawa F-15C Eagle
On January 26th 1991 4 F-15C Eagles of the 58th
TFS/33rd TFW intercepted 3 Iraqi MiG-23s south of Bagdad. Operating
with an E-3 AWACS, the F-15s were vectored to intercept 4 MiG-23s for a frontal
aspect AIM-7 shot as the MiGs approached the city. Before the AWACS could vector the F-15s for reasons unknown, one
Mig-23 turned back and departed the way he came.
At 30 miles from the MiGs , the F-15s divided up the remaining targets
with the 4th Eagle the odd man out as they dove to increase speed & locked onto the targets. Almost immediately, the 3 Eagles were at
optimum range and ripple fired two AIM-7s at each MiG. The lead MiG never know what hit’im until he
was on fire; the other 2 started evasive action soon enough to take the
missiles in gut instead of blowing up in their face. In 7 seconds, BOOM! BOOM! BOOM! 3 smokin’ holes in the dunes! (1p104)
To build this F-15C, Ser No 85-108, MiG killer, I used:
* Hasegawa 1/72 scale F-15 kit
* Hasegawa Weapons set V
* True Details ACE II ejection seat
* Aries F-15C/D Exhaust Nozzles
* Eduard F-15 Zoom set for the cockpit
* Repli-scale decal sheet 72-1033
* Wolfpak Decal sheets 72-068 & 72-069
This was a challenging build. The molds are showing their age with flash
and some fit issues. I thought I could
save a little time & build the cockpit closed and avoid the detailing the
electronics pit behind the seat. WRONG!
The canopy fit closed is awful. Whatever
time I saved in the cockpit I lost on the canopy. Just about every seem on the
plane required filling & sanding. Not a problem just a time killer.
The forward fuselage with
the cockpit is split vertically while the aft fuselage is split horizontally.
The seam between the two assemblies needs a little filler and cleanup & is
right between the two intakes. The instruction sequence calls for the intake
pieces to be glued in place before gluing on the forward fuselage. Save
yourself some aggravation, and leave the intakes off until you're happy with
the fuselage seam.
I achieved the darken base of the afterburners cans with a #2 pencil. I primed the parts with a light coat of Mr. Surfacer; when dry, I colored the ring with the pencil yielding a shiny, dark tempered metal look.
The weapons decals from Wolfpak worked well & look great! They really
make the missiles stand out. All the
stencil decals are from the kit, Hasegawa decals have come a long way from the
“open & discard” decals of my first Hasegawa kits. The Hasegawa F-15 model is not a shake'n'bake kit, but, overall, I'm pleased with the results. The kit captures the graceful look and brute force intimidation of the Eagle.
References:
1) …AND KILL MIGS Air-to-air Combat from Vietnam to Gulf War
(3rd Edition) by Lou Drendel, Squadron / Signal publications, Carrollton,
Texas, USA, 1997.
2) THE MODERN EAGLE GUIDE, the F-15 Eagle/ Strike Eagle
Exposed by Jake Melampy, REID AIR PUBILCATIONS, Lebanon, Ohio USA, 2008
3) Detail & Scale
Vol. 14 F-15 Eagle by Bert Kinzey, Aero Publications, Inc., Blue Ridge Summit, Pennsylvania,
USA, 1984.


This comment has been removed by the author.
ReplyDeleteMeant to say Love that CAMO Paint JOB!
ReplyDelete